Friday 31 May 2013

A Girlie Version Of Yesterday's Offering!

Hi crafty folks.
Hope you have been enjoying the beautiful weather today and apparently there is more to come this weekend. Dare I say it... Summer has arrived!!
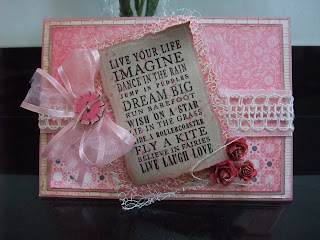
Today I have a card to show that is pretty much the same as yesterdays but with a more girlie feel. After posting yesterday I went away and made the female version because I wanted to make the Spellbinders A2 Distressed Edges dies look more feminine and I think they do. Probably down to the colour choice but I liked the result anyway.
The supplies were much the same as yesterday and the card was constructed in much the same way. The only differences are the Prima flowers and buttons(Rosarian), the twill lace,


some Creative Expressions Satin Edged Organza ribbon and the sentiment stamps. The sentiment on the card is from Inkylicious, as is the tiny Dandelion stamp that you cannot really see on this photo but I used it on both sentiment die cuts and stamped it using Tim Holtz Worn Lipstick Distress ink. I used a Heartfelt Creations stamp for the sentiment on the matching box. The sentiments were stamped with Ranger Black Archival ink and embossed with clear embossing powder. All edges were inked with the Worn Lipstick. I also used a layer of cream webbing (Kanban) as an alternative to another card layer on the matted die cuts. You can just about make it out. The inside of the card was matted and layered to match but I left a ledger piece of paper blank for writing a message on.
The papers were My Mind's Eye again and were as follows:
Stella & Rose Hazel "Memories" Lithe Lines Paper
Stella & Rose Gertie "Little One" Darling Dots Paper
Stella & Rose Hazel "Lovely" Adorned Paper.
Don't you just love the names! I'm a sucker for all things girlie and pretty but still sat on the fence as to whether I love the pink card more than yesterdays little number!
Anyway I shall disappear as I have a busy weekend coming up (family stuff) so I won't get back here until Monday, just in case you think I've gone AWOL again!!
Have a great weekend whatever you are doing and whoever you are doing it with!!
Thanks for looking
Michelle x.

Thursday 30 May 2013

More Fathers Day craftiness!

Hi crafty people. I'm finally getting back on track and catching up with a few makes. Today I thought I'd show you another Father's Day card as it's right around the corner (16th June in case you come from Mars!!). This card was pretty easy to finish quite quickly and amazingly, and unusually for me, only involves one Spellbinders die.
I love the colour combo and I think you could use it for a female card also. Maybe just use more ornate dies, and flower dies of course!
It all began with a humble piece of Kraft card (Creative Expressions, courtesy of Create and Craft) and onto this I layered a ledger piece of paper (My Mind's Eye Stella & Rose Hattie "Remember" Roses paper) and placed a layer of the Kraft card onto this. I then layered a strip each of My Mind's Eye Stella & Rose Gertie "You & Me" Numbers paper (top strip)) and My Mind's Eye Lost and Found Breeze "Boyish" Plaid paper). All papers were distressed at the edges with scissors and inked with Tim Holtz Peacock Feathers Distress ink.
I then wrapped three different colours of Seam Binding (AngelCrafts Embellishment Kit) around the layers and used the remainder to make a double bow. I then used Spellbinders A2 Distressed Edges dies and cut four pieces out starting with the largest die in the pack. I then layered these up placing then at various angles and stuck them down with Pinflair glue for dimension.
I then used a sentiment stamp from Waltzing Mouse (Man of the Hour set) and used Oregano Adirondack ink and Stamps Away clear embossing powder. I used another sentiment from this set for the inside of the card. I then added a button (AngelCrafts) and threaded it with a kraft coloured twine (Waltzing Mouse) and loosely draped more twine across the front of the card and on top of the matching box.


The matching box was made with the same card and I used my Crafter's Companion Ultimate Pro to construct it. I then used the Distressed Edges dies to add dimension and a home for a further sentiment (Waltzing Mouse). Again I added a button, which I inked along with the other button and draped twine across the front of the box and through the button.
Check out the My Mind's Eye papers. They are fab and honestly calling them papers doesn't do them justice. They are akin to cardstock and were strong enough to make a box that easily holds the weight of this card. The Stella & Rose line has a lovely canvas texture and yet my sentiments stamped beautifully on it. I've had it a while but I'm sure you can get hold of it.
Hope you like it and were inspired to get crafting your own Fathers Day creations.
Back Soon
Michelle x.

Tuesday 28 May 2013

Life Getting In The Way!

Hi fellow crafters/bloggers.
Sorry I haven't posted in a while but I have been a little under the weather, as has my Mum bless her who has been unwell since her last big dose of radiotherapy. What with school hols and the bank holiday weekend I haven't managed to finish much of anything in the crafty sense so I will apologise in advance if you visit me on Twitter because I'm going to show you something that already appears on my Twitter page. I was sat with hot drink in hand earlier today (What's happened to our Summer?) and I heard Dawn Bibby mention that people would be starting their Christmas cards soon and I thought well, before this past week, I had already started on some Christmas projects so I thought I would show you an Advent Calendar I made last year. I am making a very similar one for someone else at the moment but the one below I made for my youngest son and he loves it. Problem was he didn't want to put it away!
The Calendar is an MDF kit from Kaisercraft and the papers used came from a Graphic 45 collection called A Christmas Emporium and it is just lovely. The MDF kit comes with all the little draws to assemble and the numbers too. I sanded down all the pieces. Painted them with Kaisercraft paint in Soft Moss and used Tim Holtz's Distress Crackle Paint (Clear Rock Candy)over the top. I then ran over the cracks with Vintage Photo Distress ink and I edged all the papers with the same. When all the papers were stuck I gave everything a coat of Claudine Hellmuth Matt Multi Medium for added strength and protection.
The little trees are from Tim Holtz and come a natural colour so I put these in a little bag with some Adirondack alcohol inks (Meadow and a little bit of Stream), shook the bag until the trees were coated and left them to dry. I added a little glitter at the tips but that doesn't show up so well on the photo. The main picture was a piece of paper from the collection that I decoupaged up and added a few Kaiser pearls for the tree.

The Reindeer and the tree were chipboard shapes that I had. I think they were from Tando and the sleigh was cut on my Cricut using the A Quilted Christmas cartridge. I used Flower soft for snow.
Sorry I couldn't get this pic the right way but it shows one of the sides. The poinsettia was cut using Spellbinders Layered Poinsettia. The Naughty/Nice list came from the paper and I just curled it with a bone folder to give it dimension.
The great thing about doing one of these is that you can fill it with whatever you want. It doesn't have to be all sweets and chocs if your worried about what your kids eat although Christmas is a time for all that indulgence! You can also put little notes in to increase their excitement and the best thing is that if you get bored with it you can recover it!!
Well whether you start your Christmas crafting now or not give these calendars a go as they give lots of pleasure and are lovely to make and if your like me and you have a ton of Christmas cards to make for personal use and for others get crafting now. You'll be glad you did.
Back Soon (That's a craft promise!) 
Michelle x.

Tuesday 21 May 2013

Still moving!!

Hi folks
I'm still busy sorting out my new craft space but it's taking some time as I am emptying the new space( No 1 child flew the nest in January but left tonnes of stuff) and redecorating it as well as sorting through all my stuff to move into new space...nightmare why did I start this now I ask myself! As you can imagine time to make stuff is at an all time low and I am only completing pieces that were ordered so I thought I would show you something I have been working on for some time and because it's for me I have to keep setting it aside to finish more pressing projects. It is an album I made from scratch using to 8x8 pieces of chipboard that became my front and back covers and a paper collection from my fav Graphic 45 called Steampunk Debutante. The spine is an accordian fold with individual pocket pages attached to each fold.


As you can see there was a little fussy cutting, I just loved the roses paper for this, and paper rolling involved along with some Spellbinders Bitty Blossoms. The various bits and bobs are Tim Holtz, Graphic 45, Prima and the netting was from Websters Pages. The ribbon, seam binding, which I dyed with Tim Holtz Distress Stains and a spritz of water to match the papers, and the hat pins were all from my stash. I still haven't completed the album yet but I made it to hold pictures of my Grandparents and my Parents, myself and my Brother when we were kids.
Here is a little more of the completed parts. I never work in any order on these things. I just do a page as an idea comes to me.


Each one of the pages has a pull out piece as in the Bracket shaped piece you can see in one of the above pictures and others have a pocket on the front of the page like the one that holds the mini book. There is a tutorial on the Graphic 45 website for making this little book but it is really easy and if anyone is interested and cannot find it I will make my own to show you. Given the pile of work, the decorating and moving, the training and everything else inbetween it could be Christmas before I finish it but I will be back with it at some point in the future. Speaking of Christmas I just had to show you this picture.
Our 6 year old was playing out on the back patio on Sunday afternoon. He was really quite and anyone with kids knows that can spell trouble but when I went out to look at what he was doing he had been drawing, colouring and cutting out paper flowers (his Dad says he spends far too much time with me!) and he was decorating one of the box trees that to him looked like a Christmas tree. When I asked him why one of my Camelias was on the top he said it had "fallen off" my tree and so he thought he would use it for the top of the tree like a star. I had to laugh at him. Looking at it it was very creative and when he had finished it looked great but my camera battery gave up so I didn't get a shot of it. I only got the work in progress shot! Does he remind you of anybody!! My Husband capured the finished article on his phone so I must nab the photo Aw bless and there was me thinking the little rascal was up to no good, although he did behead my Camelia tree!
Back soon
Michelle x.

Saturday 18 May 2013

Moving!!

  
Hi folks. Glad its the weekend, aren't you? Well I'm still super busy and now I'm moving my craft room from a downstairs room to a spare bedroom upstairs. I have basically outgrown the downstairs space and need a little more room. I'm ashamed to say I can't even get near my desk at the moment as that pile of "to do's" and stuff to put away has just got bigger and bigger and now it's toppled over and I don't have the energy to address it knowing I've no where to put most of it! Anyway everything I'm making at the moment is half finished. Do you do that? Or is it just me? I never do one thing at a time which is sometimes my downfall! Anyway I thought I'd show you a card I made a while ago as at least that's finished and that's what you want to see right? This was actually an Anniversary card I made for someone but I guess given the purpley red colour it would make a nice Valentines card too.

 
 The beautiful flourish in the corner is not my from usual go to Spellbinders dies but I saw it at a Craft show and just loved it and had to have it. It is actually a Cheery Lynn die called Victorian Romance Flourish. The one thing for me that's sets Spellbinders apart from other dies is the embossed detail and whilst this is still a pretty die it doesn't have that embossing which leaves the die cut a little flat and one dimensional. I am slowly succumbing to other die manufacturers but Spellbinders will always be number one in my opinion.
 Speaking of which I used Spellbinders Lace Doily Motifs and cut two of the largest die in the set in order to make two square shapes into the rectangle shape I needed. I also used Labels Twenty Nine and you can just about see it behind the sentiment which was taken from a Simple Stories paper collection. It's unusual for me to do this as I like to stamp my sentiments but it was such a lovely sentiment and they just don't make stamps that say everything you need and if they did it would cost a small fortune and the storage...well I wont go there eh!
The patterned and the cream card used was Kanban. The red coloured card was Co ordinations. The cream card was embossed with Couture Creations Tied Together folder. The red border with the hearts cut out was from the Spellbinders Edges and Inserts dies. I can't tell you what they're called as I just put all the sets on two A4 magnetic sheets and didn't write the names on! The hearts, which technically are the waste, were used to embellish the flourish and to even up the card on the eye I placed the other two in the top corner. The card was finished with some thick ribbon from my stash and a Prima pearl flourish. Unfortunately I didn't write down what I used to make this card. I always do now and recommend you keep a record of items, dies, paper etc that you use on each project so you can look back and find something easier. Don't do what I'm doing now and try to recall from memory, it will drive you nuts!! The centre piece on the ribbon were pieces cut with Spellbinders and when I come across them I'll let you know what they are but for the life of me I just can't remember! Call yourself a Spellbinders fan!!! The centre piece is a button from Webster's Pages.
As always the box to house the card. Two sheets of A4 Kanban cardstock. The tendrills are left overs from the Cheery Lynn flourish. The mystery die again! Also Spellbinders Spiral Blossom One. The stamp used is from Clarity Stamps.
Have a great weekend whatever you are doing. Back soon
Michelle x.

Wednesday 15 May 2013

Busy Busy Busy!

Hi to all.
Sorry for my absence but have had a lot on my plate these past few days and I have had to step up the training a notch as I have sold some serious raffle tickets for my Fathers Day card and so don't want to let anyone down. Plus my husband and kids and a whole bunch of peeps are coming to watch my "performance" so I want to do it without looking like I am going to keel over!! Anyway wanted to show you a card that I made to thank all the lovely gents that are clients of The Gentry Didsbury that have been buying the raffle tickets. The card will be on display at the salon tomorrow for anyone to read.

 
There was an awful lot of die cutting involved with this one. I started with my trusty Kanban card stock in white and used an A4 Spellbinders embossing folder called Dainty Dots to emboss the entire card base. I then used some Navy coloured card along with a patterned piece called Jubilee Damask and used A2 Curved Borders One (Spellbinders) to edge my matting layers.
I then used two different Spellbinders sets from two Becca Feeken papercraft kits to cut the fancy square and circle and the fancy corner piece. I then used a set of Waltzing Mouse stamps called My Kind Of Guy. This was the set I also used to make the Fathers Day card and I just can't stop using them as they are so different to much of whats out there in terms of stylish sentiments for men. The word "Gentlemen" actually says "Gentleman" on the stamp set so I stamped the word twice and cut out the "e" from the extra stamped word and swaped the "e" for the "a" and mounted the pieced together word on some navy card. I then used a small die from Spellbinders A2 Fancy Postage Edge to stick the mounted word onto and finished it with two navy rhinestones from Kaisercraft. Before sticking the die cut pieces down I threaded through some ribbon from Creative Expressions, which is navy on one side and silvery white on the other. The amazing thing about this ribbon is that when its lay flat it keeps its solid colour but whenyou tie abow with it you get
both colours as the light falls on it. It's absolutely lovely. If you look closely the ribbon looks navy on the left but the bow is a mix of both colours. Very clever, don't know how they do that but I hope they make it in other colour options.
The inside panels were cut using the same dies as on the front. The central stamped die cut and the panel I have written on were made using Spellbinders Radiant Rectangles. The Thank You stamp was from a Waltzing Mouse Stamps set called Big Day Essentials. The font is beautiful. I have a Wedding Invitation set using theses stamps to show you soon.
I finished the card , as I always do, with my bespoke personalised stamp from Clarity Stamps.
I hope the guys at the Gentry like it and I hope you do too. Back soon.
Michelle x.

Saturday 11 May 2013

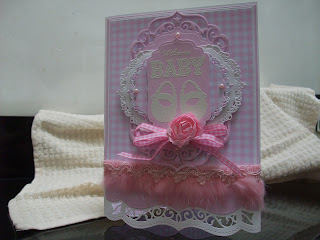
Welcome Baby

Hi and happy weekend. Hope the weather is better where you are that it has been in Manchester today! I have two cards to show you today as I couldn't make one without the other!
 
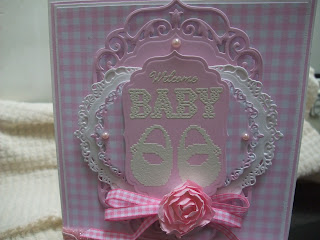
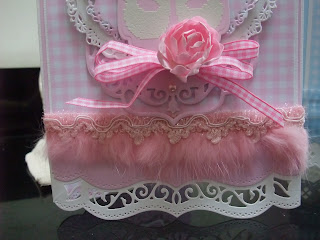
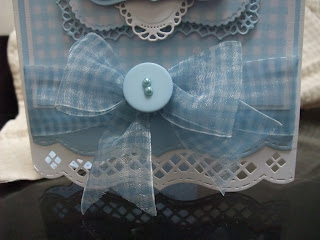
These cards were easy to put together. It was just a case of matting lots of layers. I started with the Gingham card in baby pink and blue which had a matching solid colour piece to go with it from Kanban. I took some linen textured Kanban card in white for the base card, scored it at A4 fold on the Ultimate Pro (Crafter's Companion) and then took two different Spellbinders A2 Bracket Borders One dies in two different combos to create a nice shape for the bottom of each card. I also cut the same shaped edge into the inside and back of the card and added a piece of the Gingham card to the inside with the same cut edge so that from the front you could see through to the Gingham card. I cut the same edge into the solid coloured pink and blue card as this was the first mat and it sits nicely and matches the base card edge. I then matted a Gingham layer onto a white layer and secured the trim on the pink card and the ribbon on the blue card before sticking it all down onto the white base card. The Trim was from Webster'sPages and the ribbon was from my stash. The little pink Gigham ribbon was from an Embellishments kit from Angel Crafts. The paper rose was from Magnolia and the button that I added two tiny Prima pearls to was again from my stash.


The Spellbinders used on the pink card to make the central focal point were the 5x7 Elegant Labels Four followed by the two biggest dies from Imperial Gold Labels Four. I cut and embossed these using the recommended Junior Magnetic Placement Mat and I can tell you that I had used the dies a couple of times before and they were no where near as deeply debossed without it. Even the cut was far better. I then added a final mat of Labels Four and turned it the opposite way. I stamped both cards with the same cute sentiment and baby shoes from Waltzing Mouse Stamps. I finished the card with a few Prima pearls.


The Spellbinders used on the blue card were the largest die from Decorative Labels One, then a Scalloped Labels One, then the next biggest from the Decorative dies again followed by the second largest die from Labels One Small. Again I finished off with a couple of Prima pearls.
 
 
Hope you like them. Back soon.
Michelle. x.