Monday 29 April 2013

Tis The Season!

Oh no I hear you gasp. That woman isn't talking about the C word already is she? Well you can breathe a sigh of relief, at least for now, as it's not Christmas I'm thinking about it's weddings! Many of us will be attending the wedding of somebody we know this Spring/Summer. So what could be nicer than handmaking a card for the special couple. Nothing shows you care more than giving your time to create something rather than dashing in a shop and picking a card that a thousand others have recived and this brings me to today's offering.
This was really simple to make and I don't know what you think but I would much prefer a card like this. This was made with black and cream card from Kanban's Mckenzie collection and it is beautiful and just screams wedding to me. It is already embossed with a watermarked pattern and so cuts the work time right down (no embossing). It is simply two cream on black matts with some lovely velvet ribbon and a diamonte ribbon buckle. I picked up various different ones from a craft fair. The Spellbinders used were Romantic Rectangles and Splendid Circles. I don't know why but I rarely use circles and yet this set is lovely. The stamps were a set from Inkylicious. The card was finished with a few rhinestones and it was good to go. I have to admit I'm a sucker for any new crafty product and I've bought Perfect Layers and other such devices but at the end of the day I matt and layer by eye. The tools are a little redundant! I think I should listen to my Husband more but don't tell him I said that as I will deny everything!!

 As always I like to make a matching box to house the card. This was made with two pieces (one black(base) and one cream(lid) of the same Kanban card and I used my Crafter's Companion Ultimate Pro to score the box dimensions. This was one of the first tools I invested in and boy have I had my money's worth out of it. I use it for every card and every box. If you can afford to get one..get one! You really will use it. I also make every bow I make on it! The box lid was trimmed with more black ribbon. Romantic Rectangles for the labels and a Bitty Blossoms rose and leaves. I finished with more rhinestones and used my JustRite alphas to stamp the couple's names.
Hope you like it. Back soon.
Michelle x.

Sunday 28 April 2013

Sorry I'm Late!

Hi and good Sunday evening. I am really late posting today as I have been so busy that time just got away from me. Anyway as promised I want to show you the Fathers Day card I have been making.

Apologies in advance for the photos. I literally just took them a few minutes ago.
Well what's special about this card I hear you ask? Well it's not so much the card as it's purpose. As you might have read previously I am running the Race for Life and money raised goes to Cancer Research so as I lost my Father to cancer I decided to make this card to be auctioned off and the money raised will also be going to Cancer Research along with my sponsorship money. The card is going to be up for auction at The Gentry Grooming Co in Didsbury Manchester from this Friday until the 1st June and the highest bidder gets the card for their Father.
The card was relatively simple to make it was just time consuming as there was a lot of cutting and measuring involved. I started with three sheets of cream A4 Kanban card stock. The photo doesn't show very well but the cream is a lovely buttery colour and is the nicest cream coloured card I've come across. I folded two of the sheets into an easel shape and cut the third sheet in half. The two halves were then attached to the ends of both easel card an the two easel cards were joined together. I cut two panels of the same cardstock, embossed them with one of Sue Wilson's new embossing folders called Tapestry and edged the bottom of each one with some lovely thick ribbon. I then embossed two more panels for the two fronts of the card with the same folder. Onto those I matted a brown layer of Coordinations cardstock and then matted onto those a piece of patterened paper from My Mind's Eye Lost and Found collection. I then used Spellbinders 5x7 Matting Basics A and B to create a frame for each front panel. I then glued into the frames a cream piece of card cut with Spellbinders Fancy lattice. I then cut two more brown panels, again using Matting Basics and then two of the patterned paper panels (paper same as above). I then cut a further two cream pieces and used stamps from Waltzing Mouse (their latest release). I used Adirondack Ginger and clear embossing powder. I also cut a brown and cream panel with the dies for the inside and again used the Waltzing Mouse stamps. I assembled all the layers for the panels and ran some more ribbon through the back so it was visable through the lattice. I then tied two knots and added then to the side of each panel. I finished off with some My Minds Eye pearl swirls which matched the paper.


I also covered all the individual panels that make up the easel with the brown card and the patterned paper. I still have the box to complete but it will be at The Gentry on Friday. I love the colours of this card and I'm sure my Dad would have loved it. I hope you like it. Back soon.
Michelle x.

Saturday 27 April 2013

I Love My Saturday Evenings

Hi hope you are enjoying the weekend and getting lots of crafty stuff done. I've spent most of today finishing Mum's garden and my little boy was there too (messing) helping me out. We did laugh a lot though and he was very dirty when we had finished but he had such a good time looking at ants and worms and digging. The day has flown by. Haven't made anything new today but hope to finish off the special Father's Day card I previously mentioned tomorrow and then I can explain more about it.
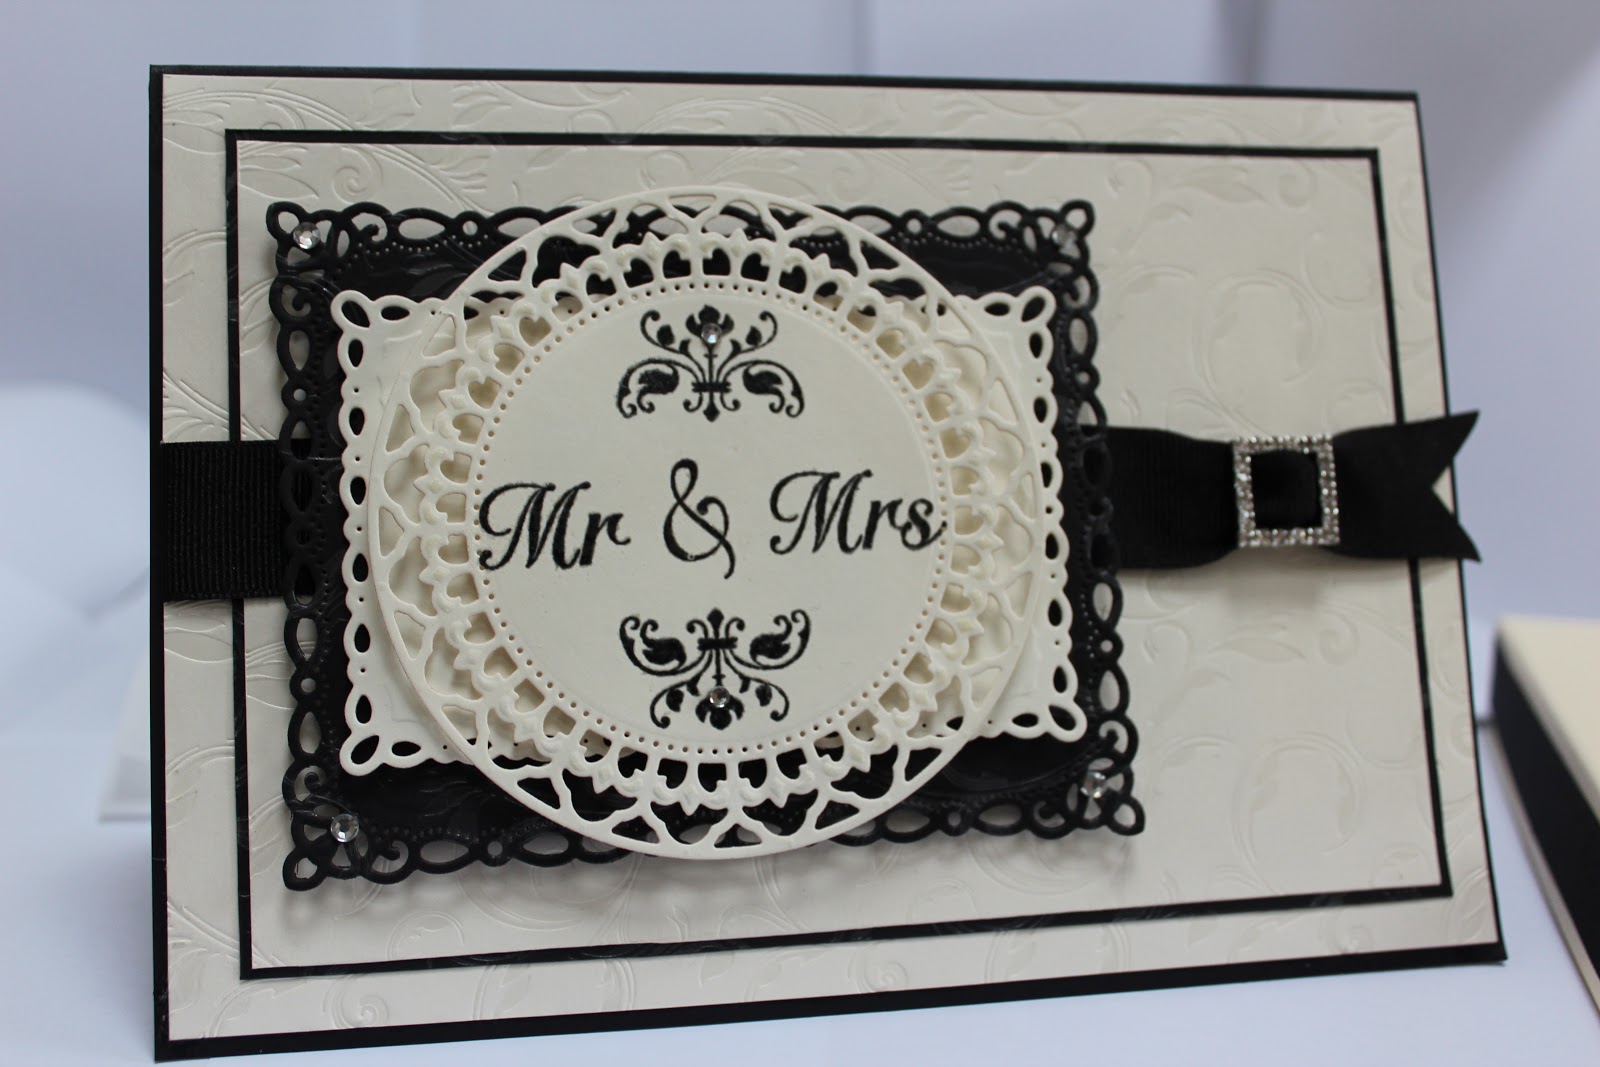
Instead of a new item I wanted to show you a very elaborate card I made for my step daughter's 18th Birthday. She's not a girlie pink kind of girl and in fact you rarely see her in anything other than purple Doc Martin's but thankfully she loved her card.
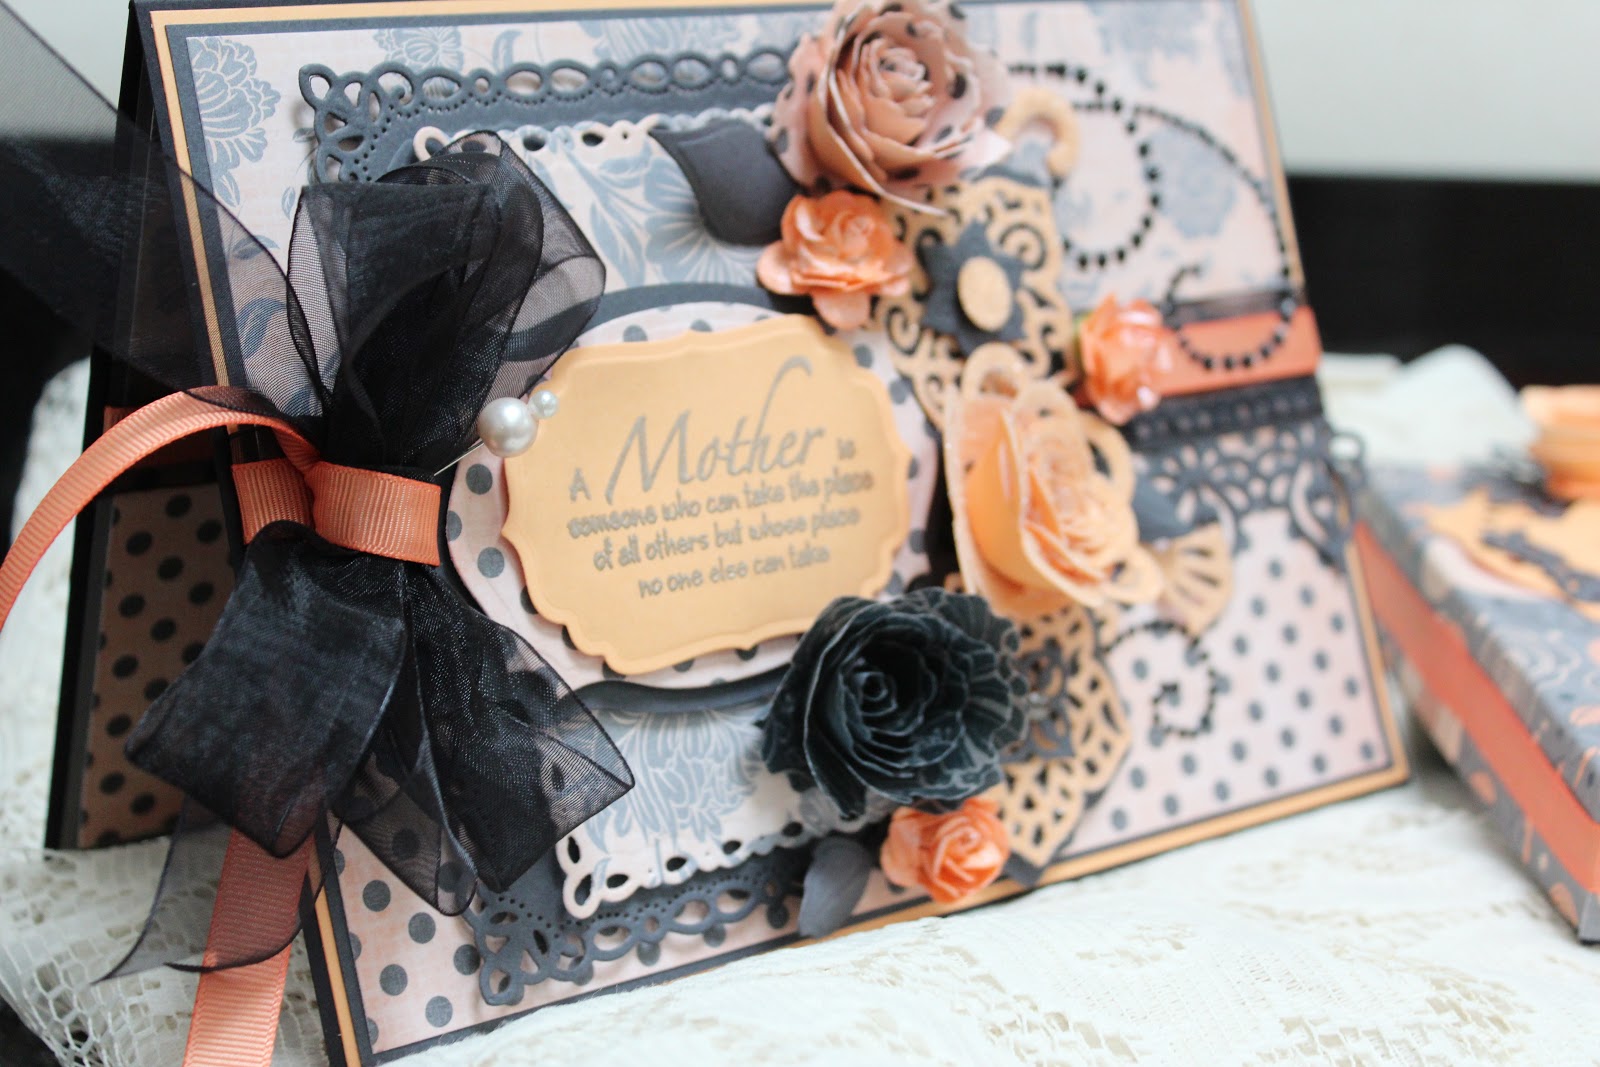
As you can see it's an easel card in my usual 5x7 size. I started with some cream Kanban cardstock for the base and then used the lovely foiled red and black Kanban card for the rest. The flowers are also made from the same card and are all made with Spellbinder dies. The Jewel flower and Flourishes dies featured yesterday were used as well as the Bitty Blossoms dies.
The stopper is made from two D-lites dies from the first release and are Flourish Trim and Fantastic Flourish One. I added some red rhinestones to the flourish and a Bitty Blossom rose so that when the card is opened as an easel the garland of flowers continues to the base of the card and looks like it's all joined together.
The dies used in the main part of the card were Marvelous Squares and Asian Motifs. I used Pinflair glue to set the layers of frames at different heights so the card was really dimensional.


The card was finished with some Zava pearl swirls and some Prima centres for the flowers, with a few more red rhinestones dotted about. I loved making this card because I love to make my own flowers (with a little help from Spellbinders). The only thing that niggles me about it are the numbers I used which were American Crafts. They are beautiful on their own I just wish I hadn't used them on this card. If I was to do it again I think I'd cut some numbers on my Cricut but oh well when are we ever 100% happy with what we make. Well I never am anyway!
Oh well thats it for today. I'm off to get my son ready as my eldest son is picking him up after work and they are going to watch Iron Man 3 at the cinema. My youngest is very excited about this as a, he is going to be out late and b, because he eats, sleeps, and breathes all things Iron Man and the brother he dotes on is taking him, bless! Me I have a date with The Voice, Britain's Got Talent, some red wine (do you see a pattern emerging!!) my hubby and friends. Have a great evening and please if anybody out there wants to leave me a comment, even if it's to tell me you agree about the numbers thing, please do. Then I'll know I'm not just rambling on to myself. Back soon
Michelle x.
 

Friday 26 April 2013

Thank Crunchie It's Friday!

That's something I often find myself saying to my youngest son when I pick him up from school at the end of the week. I really meant it today however as my weeks seem to get busier and busier and my crafting time is getting thinner and thinner! I have spent all afternoon in my Mum's back garden digging and tidying and put down new ground cover...that's bits of old tree to me and thee! I surely need erm I mean deserve that glass of red tonight!!
I have started to collect sponsor money for my Race For Life run in July and one lovely person sponsored me £100 yesterday which is wonderful given how straped for cash everyone is these days! People in this country are always amazing when it comes to charity don't you think?
Anyway today I thought I would show you a card and as I spent the afternoon working in the garden I thought a green card was appropriate. Well it's actually two tones of teal, a colour I love.
 
This card isn't matted and layered as much as it normally would because it was being sent abroad and so needed to fit in a padded envelope instead of the usual matching box that I make. I began by embossing the main piece of card with a Spellbinders A4 double sided embossing folder called Garden Lattice. The centre and the stamped piece are a paper from Kaisercraft. I used Spellbinders Resplendent Rectangles for the frame and used pinflair glue to lift the outer piece to give a little dimension. I used the Jewel Flowers and Flourishes to make the flowers and swirls. I cut three layers for each flower and then used a shaping/embossing tool and rubbed the back of each petal to make them curve and be more dimensional. I then slightly offset each layer to make them look fuller. I then glued them together and added a pearl brad from Lush to each centre.
The sentiments are stamps from Creative Expressions.I have lots of these sets and they are a good buy because you can cut up a lot of the sentiments or phrases leaving you with lots of individual words that you can make your own sentiments up with. I finished by adding a few faux pearls made using the Cosmic Shimmer Pearl glue. I hope you like it. Enjoy your Friday evening whatever you are doing.
Michelle x.

Thursday 25 April 2013

Another Canvas!

Hello out there! The weather has been miserable today. I'm hoping it gets better for the weekend. I am currently making a very special Father's Day card (more about this soon) but today I wanted to show you a canvas I made for a Birthday gift. It is probably the biggest one I have ever made at 29x39cm and it sits in a frame measuring 40x50cm.
I got the frame from Ikea and removed the glass so embellishments could hang over the edge. The papers used were from Prima and My Mind's Eye. I fussy cut around the detail of the main piece of paper to create a frame to build embellishments around. I also cut out lots of flowers from the paper to layer up and add to the dimension of the piece.

I must aplogise for the photographs. They were not my best but I was rushing to deliver the gift on time so I took them in my kitchen. The mushy pea coloured stripe behind the canvas was a colour I was testing to see If I liked it. Those of you gasping right now" urgh mushy pea green" can breathe a sigh of relief....I didn't go through with it!
Anyway back to the canvas, and yes I really am like this flicking from one thing to the next, only my mum can keep up!!, erm yes the canvas well as always I used lots of flowers, mostly Prima and I started with one of the flower stems they do (it even has little love birds on it ahh) and I built up the flowers and blingy bits around that. I used bits of lace and a resin window frame that you can just about see as I stained it with Tim Holtz Weathered Wood Distress Ink to coordinate with the colours I'd used. I usually play around with all the bits and pieces until I'm happy and then I glue stuff down. I almost always leave what I think is a final piece overnight and if I still love it the next morning that's when I glue everything in place. I hope someone out there likes it! Back soon.
Michelle x.
 
p.s I forgot to mention If you have a moment to find and follow Layer on Layer on Twitter there is a Couture Creations Embossing folder up for grabs. Watch this space for more giveaways!
Michelle x.  I

Wednesday 24 April 2013

For My Crafty Space

Good Wednesday evening! I am extremely lucky to have a craft room at home and I am constantly moving things around and reorganising stuff. Dont think for one second it's tidy though because that rarely happens. In fact I do believe it's impossible. I move stuff around to enable me to fit a 5x7 piece of card on the desk! It really is that bad!! I think a lot of crafters do this. It makes me feel better thinking they do anyhow. Part of the problem is that my room is busting at the seems with things I couldn't live without and yet half of it is still in its packaging! I used to hide half of it so I didn't induce my husband into having a heart attack but now he just ignores the ever growing stash. I do still get the odd comment fom him though particularly if he's caught me watching Create and Craft and he'll say "not got one of them yet then Shell?" He thinks he's funny anyway. I always tell him things are cheaper than they really are but my eldest son is in the know just in case I meet my demise and my husband sells all my stuff having no idea what it's really worth!!
Why is she ranting on about craft rooms I hear you say? Well it brings me to the the real subject of this post. Whilst still flowery and pretty it is not a card (if I could only hear the sighs of relief). I made this canvas to decorate the above tip.. er craft room.


 I started by covering the canvas with some lovely My Mind's Eye Paper that I had edged with a Martha Stewart punch. I think it was called a bracket border. I cut out bits and pieces from some Webster's papers and I used the Tim Holtz bird cage die. The letter M (for Michelle obviously) was a papier- mache letter that I painted and then covered with paper (My Mind's Eye again). I made a couple of the paper flowers with a flower punch and then painted and scrunched them and layered them up and stuck them together. The rest of the flowers and the blingy bits and bobbs are from the amazing Prima (some of said stuff I cant live without!) The large butterfly was a Marrianne die and I used a cupcake wrapper and some velvet ribbon to cover the mannequin which I then finished off with some hat pins and Prima bling. The mannequin was cut from some more of the My Mind's Eye papers. I hope you like it. Back soon.
Michelle x.

Tuesday 23 April 2013

The Training's Going Well!

Good Evening!
Busy day today and lots more running in preparation for July. Wanted to show you a card I made last Mother's Day. I know I seem to be showing you more cards than anything else and in truth its what I make most of but bear with me and I will try and mix it up a little. I had to show this card because I love the colour combo and as usual it has the flowers and girlie bits I love so much.


 The cardstock is trusty Kanban. The weight is perfect for holding lots of embellishments and still standing perfectly. The flowers are mostly made using Spellbinders dies; apart from the three smaller roses which are Prima. Romantic Rectangles, Labels 4, and Labels 18 were also used along with a border die from Persian Accents. The sentiments used are stamps from Inkylicious.
I always match the inside of my cards to the front but without the embellishments so everything coordinates nicely.
Hope you like it and are not too bored with me yet. I'm still learning! Back soon.
Michelle x.

Monday 22 April 2013

Just a quick one for Monday


Hello out there. Just a quick post today. Thought I'd show an easel card I made a while ago for a little girl's confirmation. I love making anything pink and girlie ( probably because I have a house full of males) so I do tend to go a little over the top.


 I used various
Spellbinder dies including Crosses Two and the Chataeu Gate die featured in yesterday's post. I made the easel stopper with some Edgeabilities dies and threaded a little ribbon through the gaps. I embossed some coordinations cardstock with a Spellbinder folder and used some glittered card from Imaginice. I made a tag that slides in the top of the card that records the date for the recipient.

 
I think the Heartfelt Creations Gate die is really useful for adding a photo or any little surprise.
Hope you like it. Back soon.
Michelle x.

Sunday 21 April 2013

Put Out Pooch!


My dog is most unhappy with me at the moment. He's feeling a little put out as I am having to spend a lot more of my time tinkering on my laptop. We've had lots of walks but thats not his problem. He's unhappy because he likes to have my undivided attention (he's just like a child!) and he loves to lie with his head on my lap but with my laptop currently replacing his head he really is an unhappy bunny!

Anyway I wanted to show a card and little gift box that I made for someone celebrating their Anniversary soon. The lucky lady is getting a ring! As always Spellbinders (the flowers) were involved as well as a Heartfelt Creations Chateau Gate die. The cardstock used was coordinations and I embossed it with a Couture Creations folder. The lady behind the gate is a lovely Clarity stamp. The other stamps used on the card were from Justrite and the word stamps used on the boxes are from one of my fav stamp makers Waltzing Mouse.


Hope you like it out there! Enjoy the rest of Sunday. Back soon
Michelle x.

Saturday 20 April 2013

The Sun is Shining


Good morning. It's looking like being a lovely day today. I'm super busy; as usual. Making my Sticky Paprika Ribs and sides for friend coming round this evening. We gather to watch Britains Got Talent and the Voice and thankfully the powers that be have put them on at seperate times this week so we get to enjoy both shows one after the other.

Thought I'd show you a card I made last night. I love making Birthday cards and always make a matching box to house it. There are two reasons for this: 1, because my cards are so dimensional they would never fit in an envelope and 2, because I think anything that comes in a gift box feels more like a gift than just a card and hopefully people will keep them! 

I used the new Spellbinders Radiant Rectangles and A2 Bracket Borders One along with some lovely Kanban cardstock. The sentiments and letter stamps are from Justrite.


Have a great Saturday. Back soon
Michelle x.

Friday 19 April 2013

Friday At Last!


Why does Friday seem to take longer to come around some weeks more than others? Just a short post as I am busy trying out the new Inkadinkado stamping gears I recently purchased from Create and Craft. I can see my youngest playing with these this weekend. Hopefully I will have something to show using these soon. Instead thought I'd show the front cover of a photo album I made. Back soon
Michelle x.


Thursday 18 April 2013

How Do People Keep Up!


How do people find the time to Blog and Tweet regularly and do everything else at the same time? Well, I'm still a blog writing virgin but I feel guilty already. I so wanted to blog yesterday but with packed lunches to make, my youngest to get ready for school, dog walking, running...yes I am slightly mental but I'm running the Race for Life in July, washing and cleaning and them my dear husband asks me if I can "knock up a birthday card". The result of all this... by 10pm I couldn't keep my eyes open and so gave in and went to bed.
Today has been equally busy so far with a food shop thrown in for good measure but I was determined to post something today. Anyway I thought I would show a card I made a little while ago. Hope someone out there sees it and likes it. This was made with various Spellbinder dies, a bit of girlie ribbon  and some lovely Kanban cardstock.
Back soon...come hell or high water!
Michelle x


Tuesday 16 April 2013

Finally Done It!


Yes I've finally done it! I've finally gone technical! Being more creative than computer savvie this is a huge step for me but now I've finally gotten round to starting a blog! Me being me I don't do things by half and so decided to join Twitter, Facebook, and Pininterest all at the same time so if anyone out there stumbles on my offerings please bear with... I will get the hang of all this!
Anyway thought I would just show a canvas I made recently. The papers used are from the fabulous Prima. I have created texture and dimension with tissue paper and matt medium and have used texture paste with Prima Stencils and inks. Some of the flowers were made with Spellbinders Bitty Blossoms dies. I just love Spellbinders. My craft room is groaning under the weight of them all, but they are as addictive as chocolate!
Well short and sweet for a first post. Im off to take more photos of things I have been working on.
Back soon
Michelle x